Finding the Axis Aligned Largest Interior Rectangle in a simple polygon
This article presents a solution to the problem of finding the axis aligned largest interior rectangle inside a simple polygon. The solution is implemented using C# in Unity 3D. There’s some mathematics, some pictures, and a link to a fully working implementation.
Abstract
The largest interior rectangle in a simple polygon is a useful piece of information in many fields and applications. While I was looking for solutions to the problem, I found articles relating to meat factories and t-shirt designs, as well as the particular problem I was trying to solve - the largest rectangular space inside my VR room boundary. As far as I’m aware, there is no trivial, fast solution to this problem, so this implementation might be useful. If you do find it useful, and you improve upon it, please share the improvements!
1. Introduction
One of the largest recent changes in Unity has been a move away from built-in code that talks to specific hardware (for example, Oculus headsets) to using an “XR Plugin” architecture, that allows manufacturers to create, and update, their own code without the need for Unity to release a new version of the Unity Editor.
The motivation behind this new architecture is good - and the implementation is almost on par now with the previous (legacy, and now deprecated) way of doing things. One area that has caused me problems, however, is the Boundary Data.
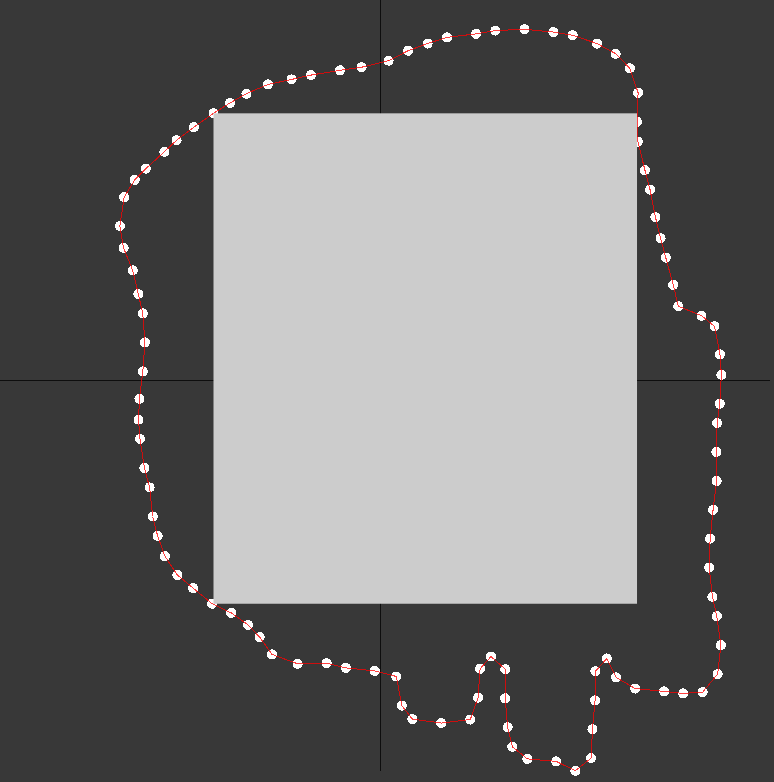
When a headset user sets up a Boundary (or Guardian) area, they are drawing out a region in space that’s safe for them to play inside. This normally helps the player avoid moving into unsafe areas - for example, running face first into a wall, or down a staircase, or smashing their TV with their controller. This Boundary area typically comes in two flavours; the raw “boundary data” (a wobbly line the user draws around the outside of the safe region) and the interior “play data” (typically, a rectangular area inside the boundary).
Some of my prototypes use the rectangular area for specific reasons (for example, locking menus to the walls). Unfortunately, the latest XR Plugins do not give me that data any more - I can only access the full boundary data.
This article details the algorithm and implementation specifics. Parallel to this, I’ve also written an article about the process of solving this problem, which you may find interesting.
2. Background
The problem I’m aiming to solve is to take a set of points in a 2D plane which describe the a simple polygon, and from those points, calculate the largest interior rectangle that is contained by that simple polygon. It’s a subclass of the Largest Empty Rectangle problem.
A simple polygon is a polygon which may be convex or concave, does not intersect itself, and has no holes.
An axis-aligned rectangle is a four sided shape, with two pairs of parallel sides, each pair being the same length. one of the pairs is parallel to the x-axis, and the other is parallel to the y-axis. (This may seem obvious, but it’s worth being clear what everything means!)
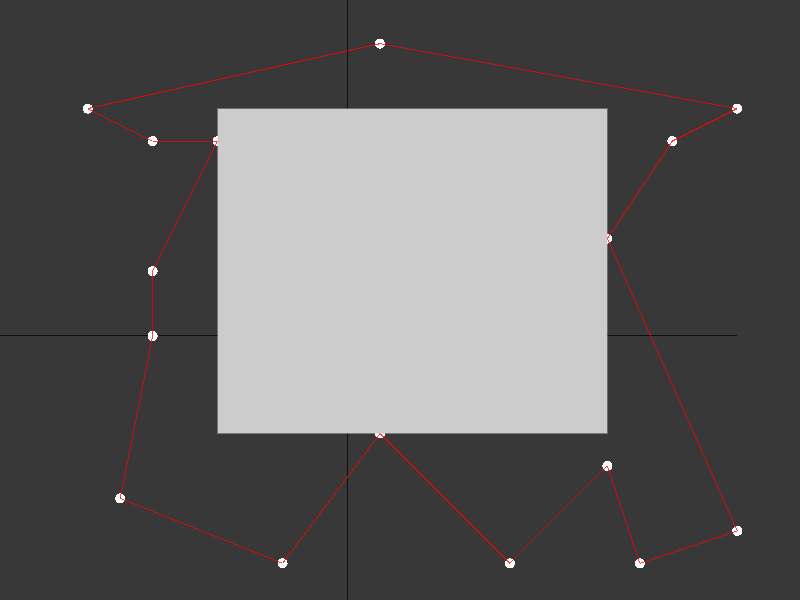
Figure 1: the largest interior rectangle in a concave polygon.
Figure 1 shows a concave polygon - a set of points (shown as white dots) connected via edges (shown as red lines) to form a closed simple concave polygon. Inside the polygon, there is a rectangular region showing the largest axis-aligned interior rectangle that does not cross a polygon edge or contain any of the polygon points.
There appear to be a variety of different algorithms that solve variants of this problem, with related works going back to the 1970s that I’ve found. One of the best papers covering the problem is written by Karen Daniels, Victor Milenkovic and Dan Roth, titled Finding the Largest Rectangle in Several Classes of Polygons. The level of understanding required to implement their solutions is currently beyond me, however. I’ve read this paper through a few times now, and the necessary understanding still has not yet sunk in.
A brute-force solution is possible, but that process would be terribly slow (as it would involve testing every vertex against every polygon edge for every possible variation of certain properties). One assumes that if it was a viable solution, it would be documented and implemented - and the papers I have digested all discuss the brute-force solution in terms of O(n^4) or O(n^5) - in other words, with the number of vertices I’m hoping to work with (up to 1000) I would be looking at billions or trillions of calculations.
A paper that I did manage to understand, and the one I used as a basis for this implementation, was written by Zahraa Marzeh, Maryam Tahmasbi and Narges Mirehi, entitled Algorithm for finding the largest inscribed rectangle in polygon. Taking this as a basis, I created a working implementation in Unity using C#.
3. Implementation
One approach to solving the problem is to divide the space covered by the polygon into an axis-aligned grid of rectangles, and then find the largest rectangle formed from these sub-rectangles.
Step 1 requires finding the smallest area rectangle that contains the simple polygon.
Step 2 constructs the grid of rectangles (cells), using each vertex of the polygon as the x and y coordinates for
the grid lines.
Step 3 optionally refines these rectangles (adding more rectangles, and hence more granularity to the resulting grid).
Step 4 scans this rectangle grid, and determines whether a rectangle is inside or outside the polygon.
Step 5 determines which rectangles are linked to (adjacent) other rectangles, in the horizonal and vertical directions.
Step 6 uses this adjacency information to calculate, for each rectangle, the largest area rectangle that can be
constructed by moving up and to the right.
Step 7 or, iterate all interior rectangles, calculating the areas for the adjoining rectangle regions, and tracking the best one.
Each of these steps is simple to understand, and all steps can be solved in a linear fashion, feeding the results from each step into the next.
3.0 preliminaries and code repository
To best facilitate visibility of the implementation, I’ve made it available on Github at https://github.com/Evryway/lir. Feel free to read along with the code on there. The documentation on the repo is fairly sparse, but the code itself (along with this article) should be enough to get you going with your own implementation.
The majority of the code is contained in LargestInteriorRectangle.cs, but there’s a few helper extensions in Extensions.cs and a Bound2D class (representing a non-axis-aligned 2D bound) in Bound2D.cs.
You can find some tests for expected pass and fail cases in LargestInteriorRectangleTests.cs. If you’re not sure how a function should work, try looking in there for an example.
3.1 Finding the smallest area rectangle
The first process is to take all the vertices of the polygon (in this case, the vs) and work out the list of unique x and y values. The simple solution is to use LINQ, like so:
    vs = Vector2[] { ... }

    xs = vs.Select(v => v.x).OrderBy(x => x).Distinct().ToArray();
    ys = vs.Select(v => v.y).OrderBy(y => y).Distinct().ToArray();
but that isn’t the fastest method (we’re iterating the vs array twice, for starters) and, while “Distinct” does indeed ensure uniqueness, it’s actually preferable to use an epsilon-check (two values within a small range) instead of equality. The actual code I’m using is slightly more complex. First, duplicate the xs and ys into two lists, and sort them.
    var xsl = new List<float>(vs.Length);
    var ysl = new List<float>(vs.Length);
    for (int i = 0; i < vs.Length; i++)
    {
        var v = vs[i];
        xsl.Add(v.x);
        ysl.Add(v.y);
    }
    xsl.Sort();
    ysl.Sort();
Then, work out the largest range (either in the X or Y) and use that to determine an epsilon that is scale relative - small enough to not alias the values arbitrarily, large enough to cater for whatever range of input we’re working with. Uniqueness is ensured by testing values as they come in with the previous value - as the list is sorted, this is a fairly fast test. Using something like a HashSet to ensure uniqueness would mean testing every item on insert, which ends up fairly slow with hundreds of items being tested each insert.
    float xmin = xsl[0];
    float xmax = xsl[xsl.Count - 1];
    float ymin = ysl[0];
    float ymax = ysl[ysl.Count - 1];
    float mmin = Mathf.Min(xmin, ymin);
    float mmax = Mathf.Max(xmax, ymax);

    var xsd = new List<float>(vs.Length) { xsl[0] };
    var ysd = new List<float>(vs.Length) { ysl[0] };

    float epsilon = (mmax - mmin) / (1024 * 1024);        // 1 millionth of the span.
    for (int i = 0; i < vs.Length-1; i++)
    {
        if (xsl[i + 1] - xsl[i] > epsilon) xsd.Add(xsl[i + 1]);
        if (ysl[i + 1] - ysl[i] > epsilon) ysd.Add(ysl[i + 1]);
    }
    xs = xsd.ToArray();
    ys = ysd.ToArray();
At this point, we’ve got our xs and ys, and our axis-aligned bounds (the min and max x and y values, respectively). Optionally, you could explicitly search for the minimum bounding rectangle prior to this step. The bounding rectangle may not be axis aligned, which would require a rotation of the polygon points to achieve alignment with an axis-aligned bound. This is likely, but not guaranteed, to help give a close to optimal LIR. More tests are needed here to determine if the cost is worth it.
3.2 Construct the Cell grid
Given an array of xs, and an array of ys, step 2 involves creating the cell grid. In actuality, this is pretty simple. For every pair of entries in xs (x[i] to x[i+1]) and ys (y[j] to y[j+1]) you have a cell cell[i,j] that is a rectangle. And we already have the xs and ys, so no need to duplicate those; simply create an array of cells, ready to work with. Each cell in cells[i,j] represents the rectangle from x[i] to x[i+1] in the horizontal axis, and from y[j] to y[j+1] in the vertical axis.
    var xc = xs.Length - 1;
    var yc = ys.Length - 1;

    cells = new int[xc,yc];
One thing to note is that, in C#, 2D arrays can perform slower than 1D arrays. The example code uses 2D arrays, but it’s fairly simple to convert the 2D indices to a 1D index - instead of using
var q = cells[i,j];
you could instead index into a 1D array like so:
var q = cells[(j*xc) + i];
Slightly harder to read, slightly faster performance, possibly worth the trade-off.
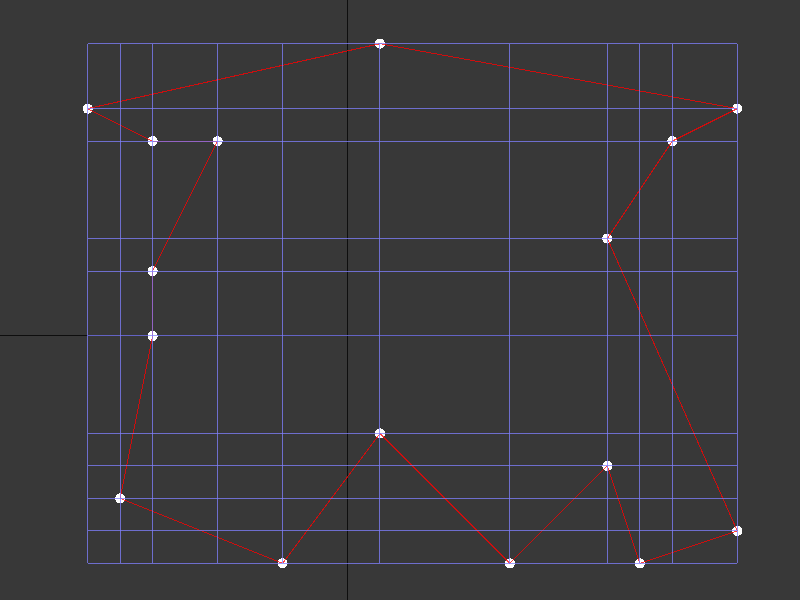
The resulting cells are shown here - you can easily see how each vertex results in an x-line and a y-line, extending to the bounding box of the polygon. In this example case, some of the vertices share lines in X and Y with other vertices - and that’s ok.
3.3 (optionally) Refine the grid
If there are not enough vertices in your simple polygon, you may end up with large cells that don’t come close to the boundary of the polygon. One option here is to detect every intersection between a polygon edge and the X/Y lines from each vertex, and then insert these new points into the vertex array (requiring a re-sort, and then a regeneration of the cells). I’ve found that with enough points, this isn’t really necessary, but it will give more accurate results (at the cost of potentially much more work). Note figure 4 for an example where it’s clearly not refined enough.
Another alternative is to downsize the number of cells (by reducing the xs and ys arrays to fewer values, for example). Again, I’ve not used this method - I found simply reducing the number of points in my original polygon achieved perfectly adequate results for my use case. If your source polygon is heavily biased in a particular direction in terms of vertex density, you might find cell reduction preferable to simply stripping vertices from the polygon.
3.4 Scan the grid for interior and exterior cells
Next, we have to look at every cell, to see if it’s inside the polygon (interior) or outside the polygon (exterior). Any cell that is crossed by a polygon edge is classed as exterior.
The naive approach is to find the xs and ys indices for the start vertex and the end vertex of each edge. Then, for every cell in that span, test the cell to see if it’s inside, crossed by, or outside, the edge.
My implementation makes a few performance improvements. Firstly, because I have (potentially) aliased some of the x and y values in xs and ys, not every vertex in the polygon will have an exact match - but I know that if I iterate the edges, I’ll always start at the end of the previous edge (so I know the indices into xs and ys for that vertex already). Secondly, I can use the direction the edge moves in the X and Y axes to determine which direction I need to search in the xs and ys arrays, so be able to find the correct indices - and as soon as I’m equal to (or greater than!) the vertex coordinates, I’ve got a span match.
    var v0 = vs[0];
    var six = -1;
    var siy = -1;
    var eix = 0; while (xs[eix] < v0.x && eix < xs.Length-1) eix++;
    var eiy = 0; while (ys[eiy] < v0.y && eiy < ys.Length-1)  eiy++;
The original implementation simply found the start and end indices by using xs.IndexOf(v0.x) and ys.IndexOf(v0.y). This is no slower in the initial case (finding eix and eiy above), but because I’m potentially skipping values in xs and ys due to the epsilon check, there would be cases where the exact x or y coordinate would never be found. the while loops ensure we get close (close enough) by simply taking the next larger value if the exact value isn’t found.
The same process is used to find the end indices for each subseqent edge - however, the edge could be moving to the left, or down, inside the polygon, in which case we need to search backwards.
This optimisation made a big difference to the running time of the algorithm.
    for (int i = 0; i < vc; i++)
    {

        var s = vs[i];
        var e = vs[(i + 1) % vc];
        var edge = e - s;

        // get the indices for the start - it should be the end vertex of the previous edge.
        six = eix;
        siy = eiy;

        // could possibly binary search, but if the edge lengths are short, a linear scan
        // should be fairly fast anyway.
        int tx = edge.x >= 0 ? 1 : - 1;             // -1 or 1
        int ty = edge.y >= 0 ? 1 : - 1;             // -1 or 1
        if (tx > 0) { while (xs[eix] < e.x && eix < xs.Length-1) eix++; }
               else { while (xs[eix] > e.x && eix > 0) eix -= 1; }
        if (ty > 0) { while (ys[eiy] < e.y && eiy < ys.Length-1) eiy++; }
               else { while (ys[eiy] > e.y && eiy > 0) eiy -= 1; }

        // we now have a span.
        var span_x_start = Mathf.Min(six, eix);
        var span_y_start = Mathf.Min(siy, eiy);

        var span_x_end = Mathf.Max(six, eix);
        var span_y_end = Mathf.Max(siy, eiy);
Now, given my spans, I know which cells come into contact (or proximity) of that particular edge.
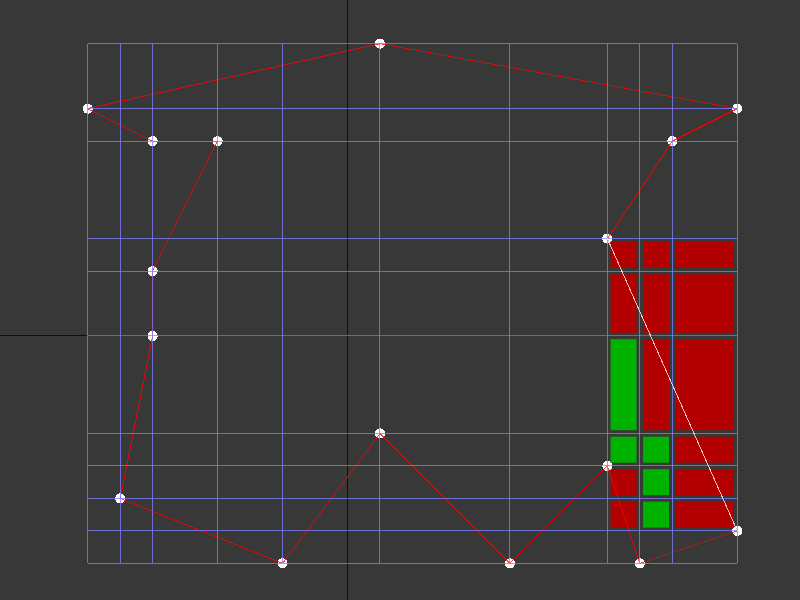
Figure 3 shows the cells spanned by the lower rightmost edge (drawn in white). Exterior, or crossing, cells are marked as red. Interior cells are marked as green. The bottom left two cells are marked as red - they are interior to the edge we’re currently testing, but they have already been marked as exterior because they are crossed by a previous edge.
The interior / exterior check is fairly simple - work out the edge “into” direction (which is basically the edge normal, in the direction of the polygon interior). We then pick the “best” cell corner to test against - if the “best” corner is inside the polygon, the other three corners will be, too.
Horizontal and vertical edges are special cases, as they don’t actually cross any cells (so the span is zero length in that axis). In this case, we simply identify the interior side, and mark the relevant polygons directly.
    var into = new Vector2(-edge.y, edge.x);
    int rx = into.x >= 0 ? 0 : 1;
    int ry = into.y >= 0 ? 0 : 1;

    // for -x,-y edges, the into direction is +X, -Y - use the TL cell vertex to test. (0,1)
    // for +x,-y edges, the into direction is +X, +Y - use the BL cell vertex to test. (0,0)
    // for -x,+y edges, the into direction is -X, -Y - use the TR cell vertex to test. (1,1)
    // for +x,+y edges, the into direction is -X, +Y - use the BR cell vertex to test. (1,0)

    // it is possible for two edges to span the same cell, so we check to see if a cell
    // has already been marked exterior - and if so, continue.

    // this covers all of the cells that the edge crosses.
    // if the edge is vertical or horizontal, the span width in that axis should be 0.
    if (span_x_end - span_x_start == 0)
    {
        // vertical edge. pick the cells on the interior side.
        var p = span_x_start - rx;
        for (int q = span_y_start; q < span_y_end; q++)
        {
            if (cells[p, q] < 0) continue;
            cells[p,q] = 1;
        }
        continue;
    }
    else if (span_y_end - span_y_start == 0)
    {
         // horizontal edge. pick the cells on the interior side.
        var q = span_y_start - ry;
        for (int p = span_x_start; p < span_x_end; p++)
        {
            if (cells[p, q] < 0) continue;
            cells[p,q] = 1;
        }
        continue;
    }
    for (int q = span_y_start; q < span_y_end; q++)
    {
        for (int p = span_x_start; p < span_x_end; p++)
        {
            // if we've already marked this as exterior, then skip it.
            // it's possible to be interior to another edge, but still exterior
            // to this one, so continue the check in that case.
            if (cells[p, q] < 0) continue;
            // based on the edge direction, pick the correct corner to test against.
            var v = new Vector2(xs[p + rx], ys[q + ry]);
            var sv = v - s;
            var d = Vector2.Dot(sv, into);

            // mark the cell either exterior (-1) or interior (1)
            cells[p,q] = d < 0 ? -1 : 1;
        }
    }
We’ve now tested every cell that intersects an edge, or is adjacent to a horizontal or vertical edge. That’s not all of the cells, however - we need a method to mark all of the exterior cells, and a method to mark all of the interior cells.
Here, we start at the outside edges of every row (and column) of cells, and head inwards until we find a previously marked cell. Anything that’s not already marked is exterior, right up to the point we hit an interior cell.
Next, we mark everything that’s remaining as interior. this is not correct behaviour, as there are cases which should be exterior which will be marked as interior. I only realised this as I was writing this article, which goes to show that code review is a wonderful process. The correct behaviour could be achieved by counting edge crossings, which would be more complex.
    // outside region sweep.
    // some cells may not be spanned by edges.
    // start on the outside of the region, and mark everything as exterior, until
    // we come across a cell that has been explicitly marked.

    for (int q = 0; q < yc; q++)
    {
        // from the left edge.
        for (int x = 0; x < xc; x++ )
        {
            if (cells[x,q] != 0) break;
            cells[x,q] = -1;
        }
        // from the right edge.
        for (int x = xc-1; x >= 0; x--)
        {
            if (cells[x,q] != 0) break;
            cells[x,q] = -1;
        }
    }

    for (int p = 0; p < xc; p++)
    {
        // from the bottom edge.
        for (int y = 0; y < yc; y++)
        {
            if (cells[p,y] != 0) break;
            cells[p,y] = -1;
        }
        // from the top edge.
        for (int y = yc-1; y >= 0; y--)
        {
            if (cells[p,y] != 0) break;
            cells[p,y] = -1;
        }
    }


    // sweep for interior (untested) cells.
    // in fact, mark everything.
    for (int j = 0; j < yc; j++)
    {
        for (int i = 0; i < xc; i++)
        {
            // anything that was -1 goes to 0.
            // anything that was 0 or 1 goes to 1.
            // this ensures any un-tested cells are classed as interior.
            cells[i,j] = cells[i,j] < 0 ? 0 : 1;
        }
    }
The result of this sweep should be that every cell is marked interior or exterior. Figure 4 shows this for our sample polygon.
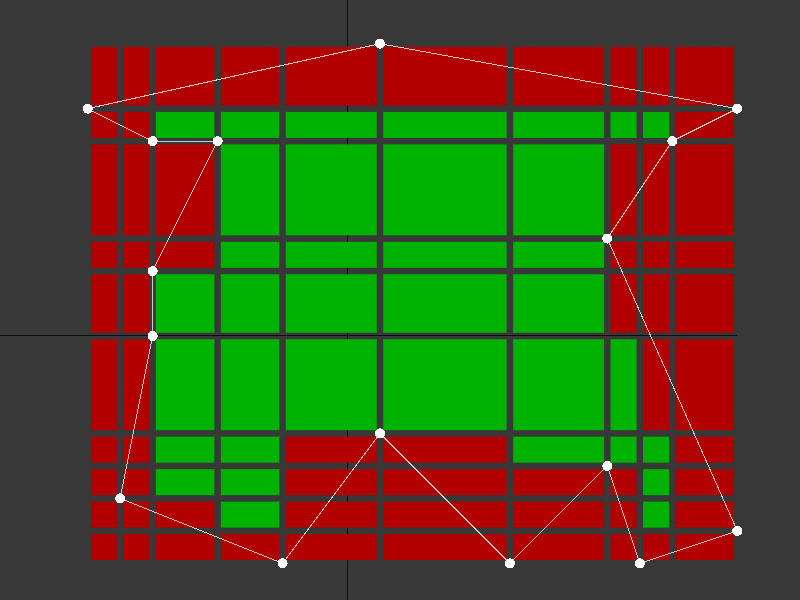
You can clearly see in this image that the top row of the interior cells does not actually touch the top edges of the polygon, and could be moved upwards. My implementation doesn’t perform this adjustment, and it would likely be a worthwhile improvement. However, the more vertices there are in the polygon, the more accurate (or close to the edge) the contacts become.
3.5 Determining cell adjacency
The paper I’m using as a reference next describes determining cell adjacency. I’ll describe the process, as I have implemented it - but I’ve found a slightly faster mechanism which I’m using to help calculate the areas which I’ll describe next.
The first action is to create two adjacency arrays - one for horizontal adjacency, and one for vertical adjacency. Next, every row (and every column) is scanned to calculate the maximum adjacency length for each cell.
Every cell knows how many cells can be traversed going to the right (+X) - and how many cells can be traversed going up (+Y). If a cell has no interior neighbours, it will have no adjacency.
    var adjacency_horizontal = new int[xc, yc];
    var adjacency_vertical = new int[xc, yc];

    // calculate horizontal adjacency, row by row
    for (int y = 0; y < yc; y++)
    {
        int span = 0;
        for (int x = xc-1; x >= 0; x--)
        {
            if (cells[x,y] > 0) span++; else span = 0;
            adjacency_horizontal[x, y] = span;
        }
    }

    // calculate vertical adjacency, column by column.
    for (int x = 0; x < xc; x++)
    {
        int span = 0;
        for (int y = yc-1; y >= 0; y--)
        {
            if (cells[x,y] > 0) span++; else span = 0;
            adjacency_vertical[x, y] = span;
        }
    }
The next step in the algorithm is to examine every cell, and create two vectors (called H and V) that describe how many cells can be traversed horizontally by each cell vertically above the root cell (these values go into the H vector); and how many cells can be traversed vertically by each cell to the right of the root cell (these values go into the V vector).
It took me a little while to understand the value of these two vectors, so here’s an image that shows the numbers for a specific cell.
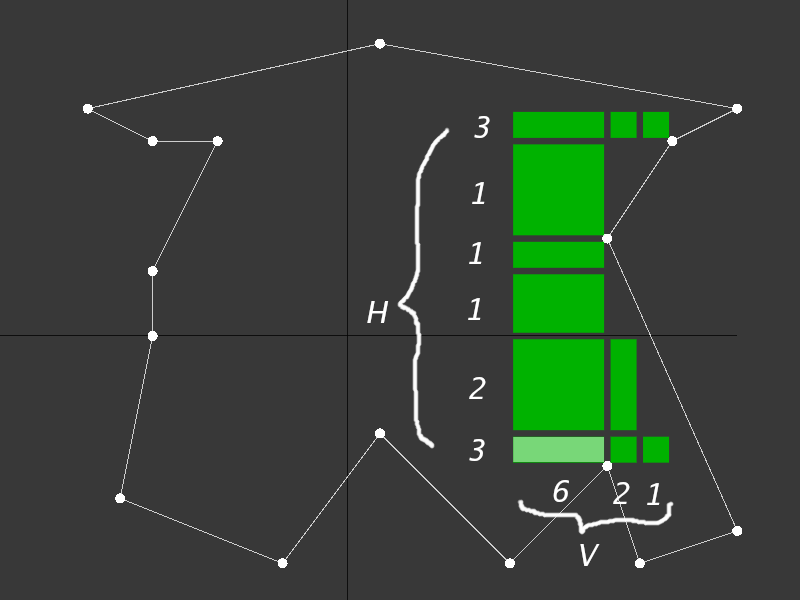
Figure 5 shows an example cell as a root. The H vector describes how many cells can be traversed horizontally, each step up from the root cell - in this case, 3, then 2, then 1, 1, 1, then 3. the V vector describes how many cells can be traversed vertically, each step to the right from the root cell - in this case, 6, then 2, then 1.
this gives us an H of [3,2,1,1,1,3] and a V of [6,2,1].
However, if we’re trying to make the largest rectangle possible, we are limited by the maximum traversal of all of the rows underneath the relevant row, and all the columns to the left of the relevant column - which means the very top value of the H vector needs to be clamped to a 1, giving the H vector as [3,2,1,1,1,1].
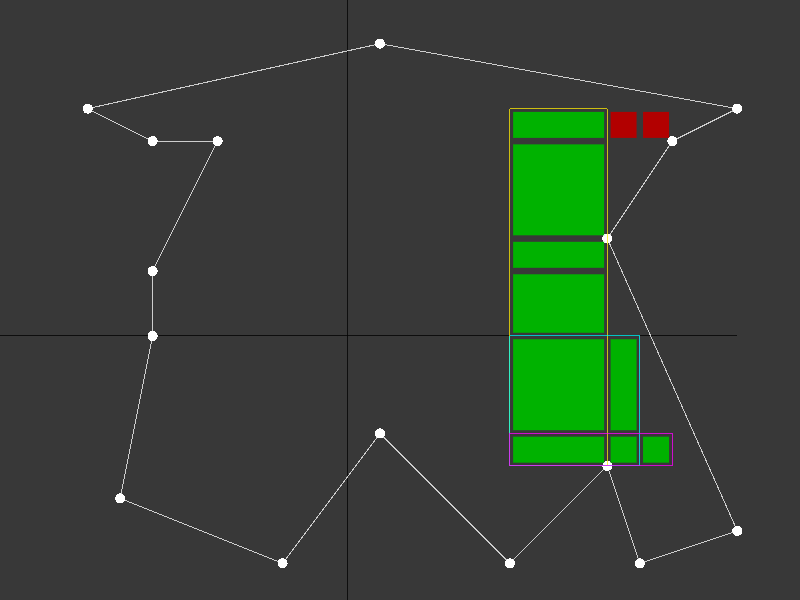
The result of combining the V and H vectors in this example gives the three possible large rectangles that can extend from the cell - one that is (1 by 6), one that is (2 by 2) and one that is (3 by 1). In Figure 6, these are shown as yellow, cyan and magenta outlines.
The clamped cells on the top row are shown in red - it’s clear that you can’t create a rectangle containing only interior cells that includes them, because the rows below constrain movement to the right.
    // generate H vector - this is horizontal adjacency for each step up.
    clir_hvec.Clear();
    // look at horizontal adjacency.
    // step up from our initial cell, and look right.

    var h = adjacency_horizontal[x, y];
    clir_hvec.Add(h);
    for (int q = y+1; q < ayc; q++)
    {
        if (cells[x, q] != 1) break;
        // each row can only be as large as the previous - a rectangle cannot push
        // further out than a lower row.
        h = Mathf.Min(adjacency_horizontal[x, q], h);
        clir_hvec.Add(h);
    }

    // generate V vector. This is vertical adjacency for each step right.
    clir_vvec.Clear();
    // look at vertical adjacency.
    // step right from our initial cell, and look up.

    var v = adjacency_vertical[x, y];
    clir_vvec.Add(v);
    for (int p = x+1; p < axc; p++)
    {
        if (cells[p, y] != 1) break;
        // each column can only be as large as the previous - a rectangle cannot push
        // further up than a previous column.
        v = Mathf.Min(adjacency_vertical[p, y], v);
        clir_vvec.Add(v);
    }
3.6 Determine the largest potential spanned area for each cell
You can also see that every time you “step” in one axis, you have to “step” in the other axis at the same time. It’s possible to jump more than one cell in each direction, but you have to move at least one cell (because, for example, if the H vector was [3,3,1,1,1,1], then the equivalent V vector would be [6,2] - and the resulting span rectangles would be (1 by 6) and (3 by 2).
This insight means you’re actually working with only the unique values in either case - so going back to our original H vector, it results in [3,2,1] against the V of [6,2,1]. Reversing either vector lets you create the spans by zipping the vectors, so for example reversing V to [1,2,6] gives a set of spans of (3 by 1), (2 by 2) and (1 by 6). That’s our spans set!
This code does not reduce the H vector to only the unique values - but it does check that the spans themselves are unique, which actually gives the same results.
    spans.Clear();

    // generate the set of valid spans.
    int2 span_last = new int2(-1, -1);
    for (int i = 0; i < clir_hvec.Count; i++)
    {
        int p = hvec[i];
        int q = vvec[p-1];
        int2 span = new int2(p, q);
        if (span.x != span_last.x && span.y != span_last.y)
        {
            spans.Add(span);
            span_last = span;
        }
    }
Given our spans set, we can trivially work out the area for each span, because we know the dimensions for each of the rectangles. Keeping track of the best area allows us to return the best found area in the whole cell set.
    for (int i = 0; i < spans.Count; i++)
    {
        var span = clir_spans[i];
        var xstart = xs[x];
        var xend = xs[x + span.x];
        var ystart = ys[y];
        var yend = ys[y + span.y];
        var xsize = xend - xstart;
        var ysize = yend - ystart;
        var area = xsize * ysize;
        if (area > best_area)
        {
            best_area = area;
            best_span = span;
            best_origin = new int2(x, y);
        }
    }
3.7 Iterate and calculate areas directly from cell side lengths, rather than spans
Noting that all potential largest interior rectangles result in equal length H and V vectors, and all distances are known before we generate the spans, means we can actually work directly with the span lengths (instead of calculating spans and then working back to the lengths).
The code is very similar to the span sweep code in 3.5 and 3.6. First, calculate the lengths of spans (instead of adjacency).
    var lengths_horizontal = new float[xc,yc];
    var lengths_vertical = new float[xc,yc];


    for (int y = 0; y < yc; y++)
    {
        float span = 0;
        for (int x = xc - 1; x >= 0; x--)
        {
            span = (cells[x, y] <= 0) ? 0 : span + xs[x + 1] - xs[x];
            lengths_horizontal[x,y] = span;
        }
    }

    for (int x = 0; x < xc; x++)
    {
        float span = 0;
        for (int y = yc - 1; y >= 0; y--)
        {
            span = (cells[x, y] <= 0) ? 0 : span + ys[y + 1] - ys[y];
            lengths_vertical[x,y] = span;
        }
    }
Then, iterate every cell, using the vertical and horizonal lengths directly.
    for (int y = 0; y < yc; y++)
    {
        for (int x = 0; x < xc; x++)
        {
            var iv = cells[x,y];
            if (iv == 0) continue;

            var h = lengths_horizontal[x,y];
            var v = lengths_vertical[x,y];

            // if the best POSSIBLE area (which may not be valid!)
            // is smaller than the best area, then we don't need to run any further tests.
            if (h * v < best_area) continue;

            // generate H vector - this is horizontal spans for each step up.
            hspans.Clear();
            // look at horizontal spans.
            // step up from our initial cell, and look right.

            hspans.Add(h);
            for (int q = y+1; q < yc; q++)
            {
                if (cells[x,q] == 0) break;
                var h2 = lengths_horizontal[x,q];
                if (h2 >= h) continue;
                h = h2;
                hspans.Add(h);
            }

            // generate V vector. This is vertical spans for each step right.
            vspans.Clear();
            // look at vertical spans.
            // step right from our initial cell, and look up.

            vspans.Add(v);
            for (int p = x+1; p < xc; p++)
            {
                if (cells[p,y] == 0) break;
                var v2 = lengths_vertical[p,y];
                if (v2 >= v) continue;
                v = v2;

                vspans.Add(v);
            }

            // reverse the v spans list - this lets us trivially combine the correct
            // spans for each rectangle combination with the same list index.
            vspans.Reverse();

            for (int i = 0; i < hspans.Count; i++)
            {
                float hl = hspans[i];
                float vl = vspans[i];
                float area = hl * vl;
                if (area > best_area)
                {
                    best_area = area;
                    best_origin = new Vector2(xs[x], ys[y]);
                    best_span = new Vector2(hl, vl);
                }
            }

        }
    }
One issue I found was generating the H and V vectors occasionally gave results where the vector lengths were mismatched (for example H would contain 16 values and V would contain 15). After matching up the results to the Adjacency Span version, I found this was due to numerical inaccuracies, and introduced the epsilon check when generating the initial xs and ys arrays. Values in there that are incredibly close together can result in identical lengths in the scan code above. In the case where the vectors come through mismatched, using the adjacency data instead is an option.
Finally, the check to see if the largest possible area was already smaller than the best area made a huge difference to the runtime of the algorithm. There may be other good optimizations sitting in there still.
4. Conclusion
And there you have it - Axis Aligned Largest Interior Rectangle. I hope someone finds this as useful as I will, and I’d love any feedback on the code and writeup.
References
Ref 1: Finding the Largest Rectangle in Several Classes of Polygons (Karen Daniels, Victor Milenkovic, Dan Roth) Ref 2: Algorithm for finding the largest inscribed rectangle in polygon (Zahraa Marzeh, Maryam Tahmasbi, Narges Mirehi)
