Week 47 - Fixing through projection
This week, I’ve been looking at fixing some of the more obvious flaws with my texturing process, including through projection.
TL;DR
Through the looking glass
The week started serendipitously when I purchased a Cream and Jam bun which contained miniscule amounts of jam. The jam isn’t really visible in the scan (which ended up in a convo with the shop that sold it - I ate it anyway).
As per usual, the scan is pretty rubbish - when I tried to capture around the object from multiple angles, I was getting terrible results, and before I move Scanner to open beta, I need to fix these issues. The issue of jam today was easily fixed by adding jam from the fridge. The issues of misaligned projection and through projection are harder to fix.
Misaligned projection happens when the colour texture is being projected onto the mesh with incorrect camera parameters - both the intrinsics (camera field of view and distortion) and extrinsics (position and rotation) affect this result, so it’s important that those are correct before I move on to any other fixup work. The first video shows my steps to confirm that the Kinect camera parameters are correct. Up to this point, I’ve been happy enough with any kind of result, but (as always) as soon as I go to measure what I’m seeing, things are not quite as they seem - so I went back to basics and started doing the math to ensure the camera parameters were correct.
It’s all just mathematics
The camera intrinsics should be something that you can query in the relevant API for the device - and for Tango, that’s true. Unfortunately, for the Kinect you can only get the depth camera intrinsics via the API - the colour camera intrinsics are nowhere to be found. Fortunately there’s loads of OpenCV code out there that lets you calculate this stuff. I got some calibration values for my main Kinect V2 sensor a few months ago - but I never actually copied them over into my scanner codebase! So that was the first change I had to make this week.
The intrinsics and extrinsics values make a huge difference to how accurately the texture projection works. the intrinsics are comprised of the focal distance (fx/fy), the principal point (cx/cy) and the image size in pixels. My default values were correct enough to look right, but incorrect enough to introduce a big offset in the centre of my projection (10-20mm lateral offset) and more error on far objects. The extrinsics were even more incorrect, as I was assuming the depth camera was in the centre of the Kinect sensor box, but it’s not - it’s about 4cm off to the right.
That’s also ignoring any distortion parameters for the intrinsics (lens warping for example) which do exist, but I’m not currently correcting for. I probably should be.
The nice thing about all of this is that once you reconcile the real world parameters with the virtual representation, everything starts to line up nicely. Vectors and Quaternions, oh my! So, by day two this week I had a few scans that looked good, and confirmed that the kinect sensors were indeed where they should be, the camera intrinsics were close to correct, and everything lined up as expected.
Through projection
I texture the mesh by projecting the image the colour camera sees onto the mesh reconstructed from the depth sensor’s view of the world. As long as there’s only one surface (e.g. a wall or a floor) this works fine. As soon as you have surfaces in front or behind each other (from the colour camera’s perspective) things break with the current texturing process, because I’m not taking into account occlusion.
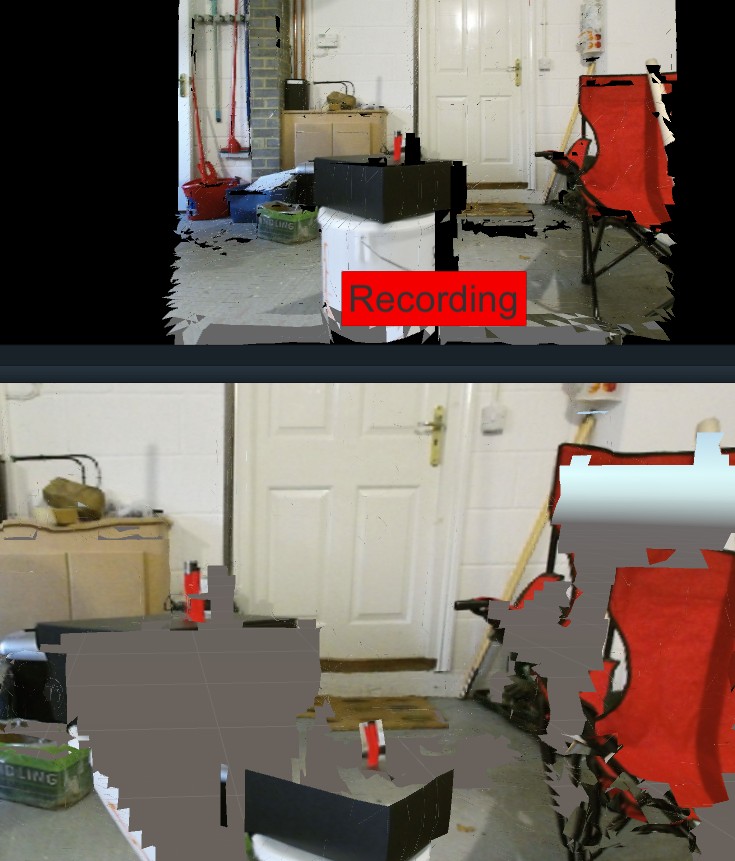
Here’s a pretty clear example. The colour camera view is in the top frame. Because the depth camera is 4cm to the left of the colour camera, the depth camera can see the wall behind the lighter, so there is mesh there (which should be wall coloured).
The bottom part of the image shows that the mesh where the lighter is is being textured with the image of the lighter, but it’s also being projected through that mesh onto the wall in the background.
I currently “fix” this by using a process that applies the “best” texture to any particular part of the mesh, so if you take a “better” picture (e.g. closer to the mesh that’s being projected on) it should pick that in preference over the further away image. This mostly works, but it means that during scanning you end up with lots of through projection that just shouldn’t be there, and parts of that often get left hanging around in the end result. It would be better simply to never apply that texture in the first place.
The observant reader will have seen this happening in just about every scan I’ve taken with a Tango device. Even more so than colour correction and mesh noise, I think this is the most annoying thing about the scans I’m currently taking.
Capturing scene depth
The remainder of the week has mostly been spent capturing the scene depth. That is, reconstructing the depth of the original photo based on the mesh I get from the pointclouds when viewing the scene from the same pose as the photo was taken. This is one method of finding out where image pixels should live on the scene geometry. It’s a load of hoop jumping, but I’ve now got depth data (of a sort!) for the photo.
mouse-over the image to see the depth data contours.

This looks like it lines up nicely on the horizontal axis, but there’s movement on the vertical axis. This is most likely related to the intrinsics still being wrong (and possibly the z value of the extrinsics being wrong, and possibly the two cameras are not actually pointing in exactly the same direction).
At least I’m getting close. This should be good enough to do some coarse testing with.
If the two cameras were in the same place (i.e. using the same sensor) this would be super-easy. I could just store the depth frame directly and it would be exactly what I need to do the maths. Oh well ;)
Reproduction rates
Getting a reproducible test case is a pain in the neck when I need to move around the room with the Phab, so after a bit of soul searching, I’ve come to the conclusion that the only sane way to make progress here is to stop working on the problem - until I’ve got some mechanism to record and replay the feed streams. Working with the data should be pretty simple (I’m already bundling it up for network transport). Putting in place some method of buffering and replaying the data shouldn’t take too long, and that will allow me to record some janky raw data and then work with it until I fully fix the issue - instead of having to get up from my seat and walk around the room.
Next week …
Replaying and recording feed streams.